 Knowledge Base
Events
The Events section lets admins create, manage, and track both recurring and one-time events such as social gatherings and scheduled classes.
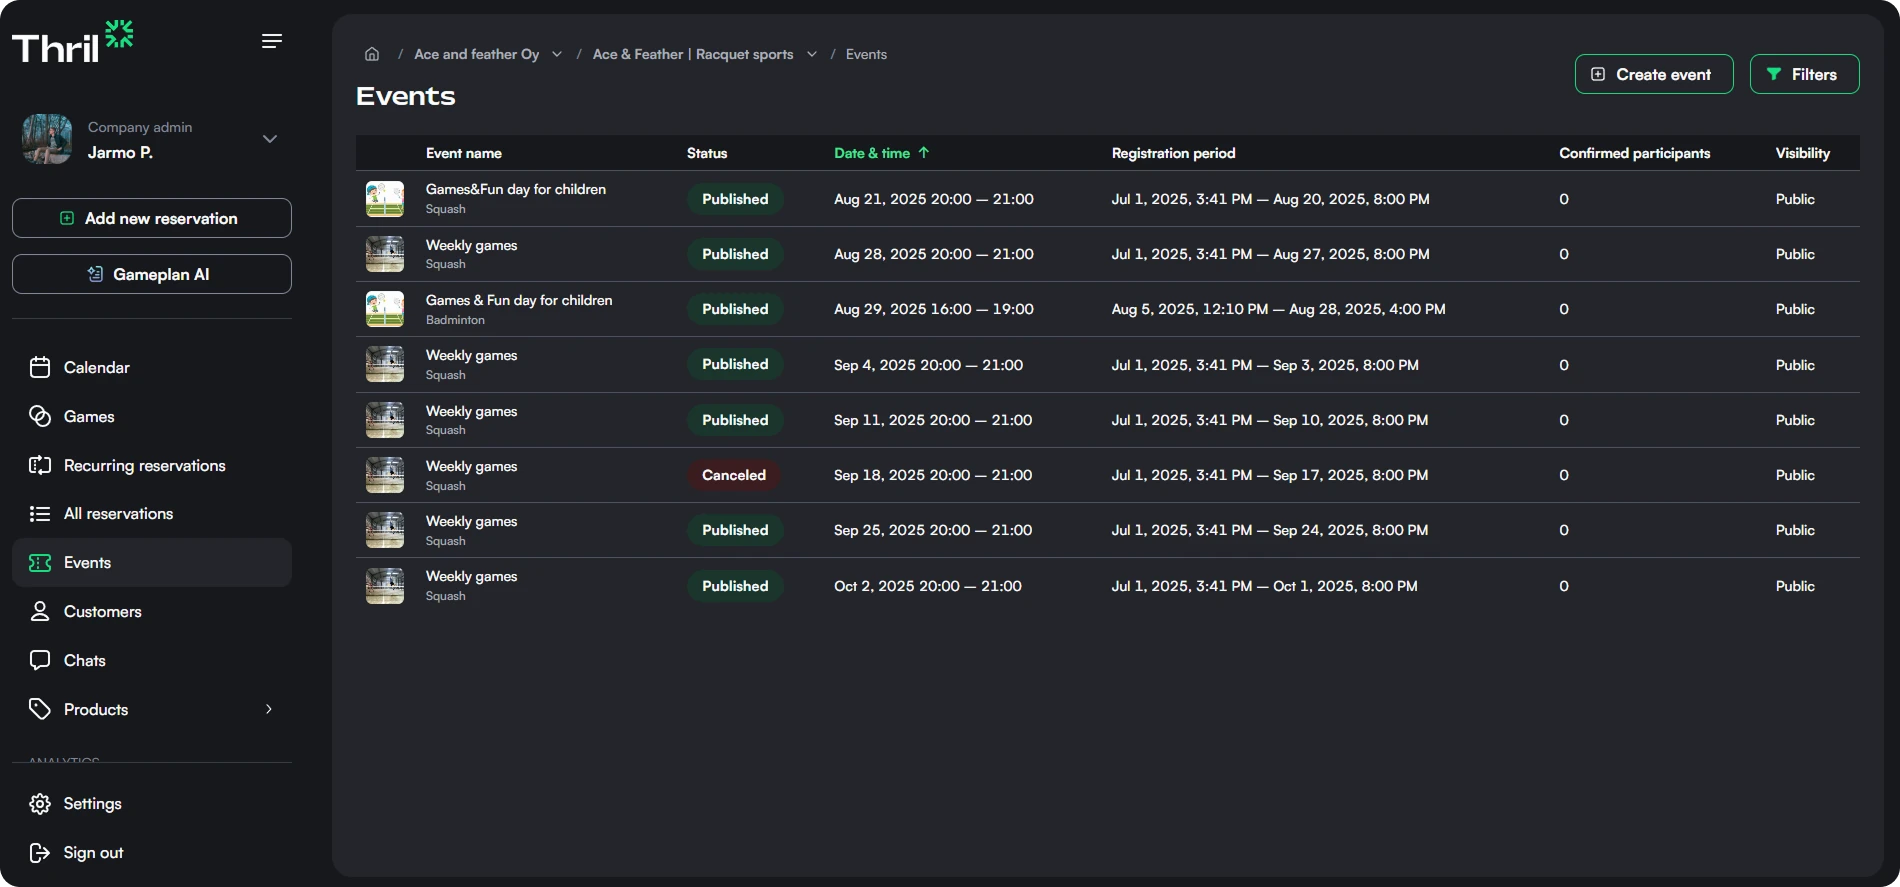
📋 Events Overview
The Events page displays a list of all created events along with key information:
- Event name & sport type
- Status (Published / Canceled / Draft)
- Date & Time
- Registration Period
- Number of Confirmed Participants
- Visibility (Public, Unlisted, Private, or Members only)
Admins can filter events or click on any event to view detailed information and manage its settings.
Finding events
- Search by event name above the table matches events by name. The Event series tab has the same search.
- The filter panel holds status, sport, Date range, event type, Event instructor, Day of week, Start time, Event series and payment status. A day column and a Start time column sit next to the date, so a set like "every Monday at 18:00" reads off the list.
- The list hides canceled events to begin with. Add Canceled under Event status, or clear the status filter, to see them. The list also starts from events that have not ended yet, so change Date range to find past canceled events. The event calendar never shows canceled events.
Selecting rows
Check the boxes on the left of each row to select events. The selection menu at the top of the table also offers Select all N events matching the filters, which selects the whole filtered set instead of the current page. It tells you when there were more matches than it could select. The events tab of an event series supports the same selection.
One request handles at most 500 events. Narrow the selection to act on the rest.
👁 Event Details Panel
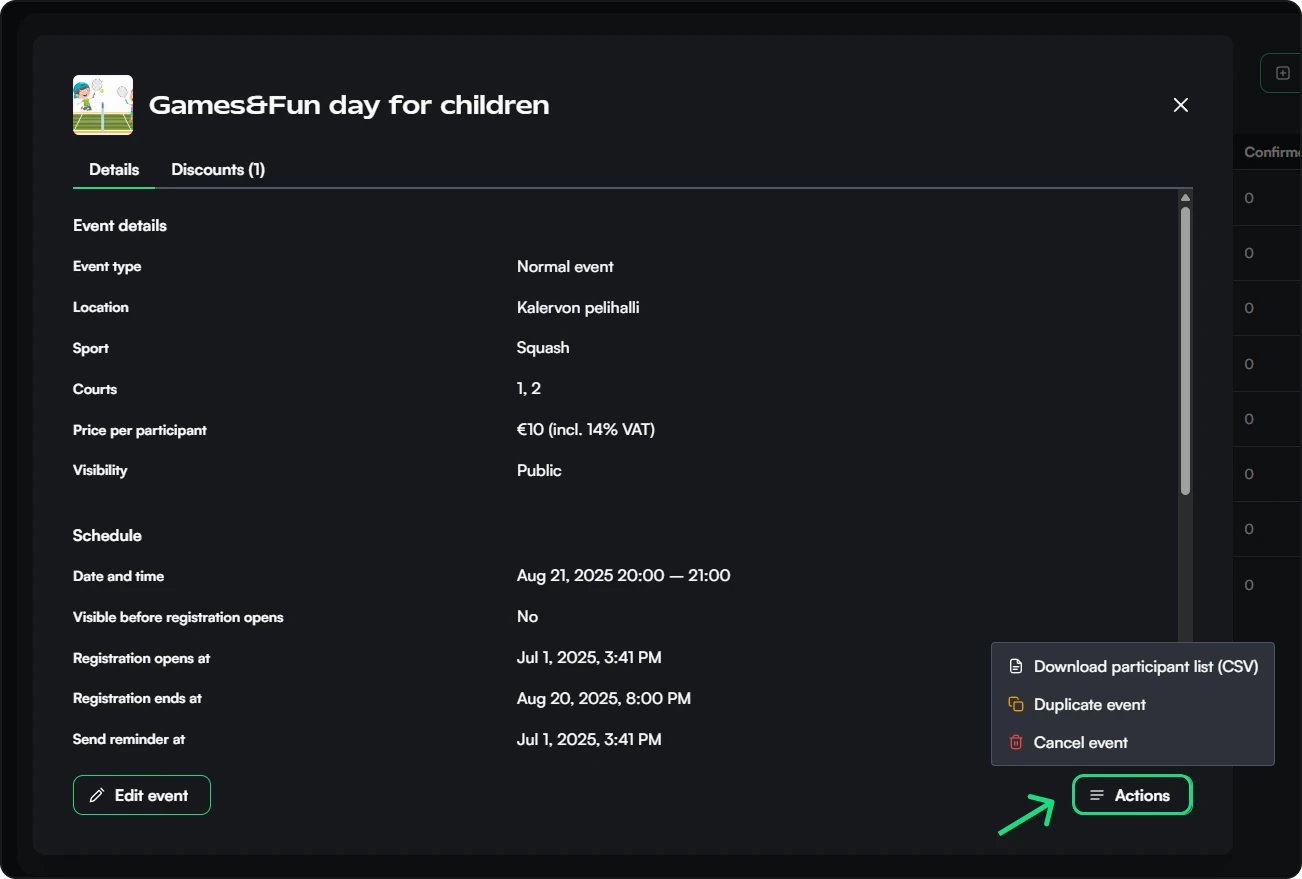
Clicking an event opens a detailed view that includes:
- Event type (Normal, Scheduled class, or Social)
- Location & Sport
- Price per participant
- Event schedule
- Registration deadlines & reminders
- Description & participation settings
- Discounts (if applicable)
- Event metadata (Creator, creation time, update logs, event ID)
Admins can also:
- Edit the event
- Duplicate the event
- Cancel the event
Paying a registration with a session card
An unpaid registration can be paid with the participant's session card later, even after the event or class has started.
- Open the ⋮ menu on the participant's row and choose Mark as paid.
- Under Session cards, click Apply next to the card. The summary shows it as Applied session card. Session cards lists only the participant's cards that can pay for this event. Duration-based cards never pay for events.
- Click Mark as paid.
Thril checks the card against the event's start time, not the day you record the payment. A card that has expired since then still pays for a class held before it expired.
🕒 Changing the Times of Many Events at Once
- Select the events you want to change in the Events table.
- Open the selection menu and choose Change times.
- Under Start time, Shift by takes an amount in minutes, hours, days or weeks, Later or Earlier. Minutes and hours move the time of day and keep the date. Days and weeks move the date and keep the time of day. Set to gives every selected event the same New start time, on the date it already runs on. Keep leaves the start times alone.
- Under Duration, Adjust by makes every event Longer or Shorter by an amount in minutes, hours or days, and Set to gives all of them the same New duration. Keep is selected to begin with, so the events stay as long as they are.
- Check the preview under Events to change. Each row shows the current time next to the new one, and the length before and after when you change it.
- Click Change N events.
Both Set to fields open on the selection's own values: the earliest start time, and the shortest length. When the selected events do not all share one, a warning triangle next to the field says what the selection has now, because Set to gives every one of them the same value.
You can move and resize in the same action. Only the end time moves when you change the length, so each event's registration deadline and reminder follow its start: a move carries them along and keeps the same lead time, and a length change leaves them alone. The times are calculated on the venue's own clock, so a series that crosses a daylight saving change lands where you expect. A change that would move an event to an unsupported date is refused, and nothing changes.
A shortening cannot be larger than the events themselves. If any selected event is shorter than the amount, the modal says how many, and the action stays disabled until you choose a smaller amount.
The modal checks the new times against the resources before you save, and a longer event is checked against its new end time. An event whose new time is taken is marked and left out, and the rest still change. If one of the new times is taken while you review the preview, nothing is changed and the preview refreshes.
You can select events from several series in the same action, so a Monday, Wednesday and Saturday series can have only its Monday events changed.
Editing the start time of a single event moves its reminder by the same amount.
🚫 Cancelling Multiple Events at Once
You can cancel several events in one action directly from the Events table:
- Check the boxes on the left of each row to select the events you want to cancel.
- A selection menu appears at the top of the table — open it and choose "Cancel selected events".
- Optionally enter a cancellation message visible to participants.
- Choose a refund option for paid participants.
- Click "Confirm cancellation".
Participants are notified automatically when their event is cancelled.
🗑 Deleting Events
Only drafts and canceled events can be deleted. Cancel a live event first, so its participants are notified and refunded. A deleted event can't be restored, and it no longer counts in the event reports.
- One event: choose Delete event from the event's actions menu.
- Several events: select them in the Events table and choose Delete selected events from the selection menu. The confirmation says how many events will be deleted, and how many will not be deleted because they are not canceled or drafts.
- A series: in the series details panel, Delete events deletes the canceled and draft events of the series and keeps the rest. The button shows only when the series has some. When every event of the series goes, the series goes too.
↩️ Restoring a Cancelled Event
If an event was cancelled by mistake, you can restore it:
- Find the cancelled event in the Events table (use the status filter if needed).
- Open the event's detail panel and choose "Uncancel event" from the actions menu.
- Select the status to restore it to:
- Published — registration open: reopens the event for registration. If the original registration window has already passed, it is automatically adjusted to end at the event's start time.
- Confirmed — registration closed: restores the event without reopening registration.
- Confirm to restore the event.
Past events cannot be uncancelled.
➕ Creating an Event
Click "Create event". If your venue has event templates, pick one to start from, or choose Start from scratch. Every field a template fills in stays editable.
The form has four steps: Basics, Time and place, Participants and price and Review. Click any step to jump to it. Moving ahead checks the steps you skip and stops at the first one with something missing, so a step with an error is marked in red. Settings that most events leave at their defaults sit in folded sections, and a summary under each one says what is set.
✏️ Basics
- Event type:
- Normal event: the default. A sport and resources are optional.
- Scheduled class: works the same as a normal event. With Separate classes from events on, classes show on their own tab in the apps.
- Social event: for get-togethers such as meetups, parties or a padel social. A sport and resources are optional here too.
- A course class is created from its course group, so the type isn't picked.
- Event name and description
- Sport type (optional): lets customers filter events by sport.
- Event image (optional): shown on the event page and in event listings.
- Event instructors (optional): one or more instructors, shown on the event page. See Instructors.
- Event categories (optional): tags such as "Yoga" or "Kettlebell" that help customers filter and find the event.
⏱ Time and place
- Resources (optional): the resources the event books. Required only with per-resource participant limits. The form warns about other bookings on the same resources at the same time. For a social event, the sport and resources are in one folded section, as most social events need neither.
- Recurrence (create only): Only once or Recurring event. A recurring event repeats every N weeks or months for the number of times you set, and its occurrences form an event series.
- Schedule: the start and end date and time.
- Held at another venue (optional, shown when another venue lets you link events to it): the event also shows on that venue's event listings. See Authorizations in Thril.
- Event location (optional): a free-text address or place name, for an event that isn't held at your resources.
- Location on map (optional): a more exact spot than the address.
- Registration: when registration opens and closes, as a preset such as "Immediately" or "1 week before", or a custom date and time. A recurring event takes presets only, counted from each occurrence's own start.
- Show event before registration opens: customers can see the event before they can sign up. Not offered when registration opens immediately.
- Reminder notification (optional): a push notification to the participants before the event starts, such as 1 hour or 2 days before.
👥 Participants and price
- Event visibility: who can find and open the event:
- Public: visible to all users on your venue's profile and accessible via the share link.
- Unlisted: not shown on your venue's profile, but accessible to anyone with the share link (even non-invited users).
- Private: not shown on your venue's profile and not accessible via the share link. Only invited participants can access it.
- Members only: visible only to holders of the memberships you choose, and only they can register. Selecting it shows the Allowed memberships picker. Leave it empty to allow Any membership the venue recognises, including memberships from venues whose members you accept. A customer without a qualifying membership does not see the event in your venue's event list, the home feed or search, and the share link gives them a not-found page. Staff can still add anyone by hand. A member who joins and whose membership later lapses keeps their place, and can still pay, sell their spot and leave. Courses cannot be made members only. A course class can: the course's own participants and people with a replacement booking keep their access, and only drop-ins need a qualifying membership. Not offered until your venue has memberships.
- Who can sign up: Anyone, Only children added by a guardian, or Only people signing in with their own account.
- Amount of participants:
- Unrestricted: no upper limit. You can still set a minimum.
- Restricted: choose one of two modes:
- Overall limits: one minimum and maximum for the whole event.
- Limits per resource: a minimum and maximum for each selected resource. Every event type can use them, social events included. Resources can be added later, but cannot be removed once the event is created.
- Minimum resources in use (optional): how many resources have to fill for the event to run. If fewer fill, the event is cancelled when registration closes.
- When registration closes, the event keeps only the resources that reach the per-resource minimum. The participants left over move to the queue, or are cancelled if queuing is off, and the unused resources are released.
- After the event is confirmed, anyone can take a free spot on a resource in use. An empty resource opens only when the queue holds the per-resource minimum, and that group is confirmed together. For example, with 4 per resource and 8 confirmed, you add 2 resources and the queue fills them with 4 + 4. If only 3 wait, the resource stays empty and the 3 stay in the queue.
- With queuing off, customers cannot take an empty resource. Staff can still add participants by hand.
- Tournament brackets with per-resource limits work the same way.
- Split into quotas: divide the spots into named quotas, such as 8 for women and 8 for men. Each quota has its own Maximum, and the event's maximum is their sum. A customer picks a quota when signing up, and the queue works per quota. A quota's Gender and Minimum are shown to customers as information only: they don't stop anyone from signing up, and the event confirms on its total count. The price is the same for every quota.
- Note: if the minimum participant count is not reached, the event is automatically cancelled.
- Cancelling an event or a course class, by hand or automatically, also cancels its reservations on the resources, so the courts can be booked again.
- Queuing: optionally enable a queue. If a spot becomes available, the first participant in the queue is automatically moved in and notified. With per-resource limits, an empty resource waits for a full group (see above).
- Payment to join the queue (when queuing is on and the event has a price): choose whether customers pay the event price, or use a session card, to join the queue.
- Venue default: follows the venue's Require payment to join the queue setting. If you change that setting later, this event follows the change.
- Required or Not required: the event keeps this choice, whatever the venue default is.
- Not shown for course classes and tournaments.
- Price per participant: the gross price. Leave it empty for a free event. A paid event also takes:
- VAT rate
- Employee benefit eligibility (Finland, Sweden, Estonia and Latvia): whether participants may pay with an employee benefit method, such as Epassi or Stebby.
- Discounts: discount groups or memberships that lower the price.
- Participant visibility: whether other users can see the participant list:
- Visible: participant names, profile pictures, and handles are shown to other users.
- Hidden: participant details are hidden from other users; participants are also anonymized in the event chat.
- Fully hidden: also hides the participant and queue counts, the participant limits, the available slots and the customer's own queue position. Customers still see whether the event is full. In the event chat a participant sees only the venue and themselves, everyone else appears under one shared anonymous name, and only the venue can write messages or add reactions. Joins are not announced in the chat. A course group chat is covered by every one of its classes, so one fully hidden class locks and anonymizes the whole group chat. Staff views keep showing real names and numbers.
- Track attendance (when attendance tracking is on for the venue): lets staff mark each confirmed participant as present or absent. See Event attendance.
- Internal notes: notes for venue staff. Customers don't see them.
Session cards are not set here. Each card decides which events it pays for, under Session cards in Products, and the event's Pricing and benefits tab lists the cards that cover it.
✅ Review
Review lists every setting, step by step. Edit takes you back to that step. A booking that blocks the event's resources at its time shows here too, and stops the event from being created until you change the resources or the time.
- Also save as a template: saves the event's settings as a template, under the name you give it, for the next event. A template keeps everything except the dates, the publishing and the reminder. With access to more than one venue, you can share it with every venue in the company. Not offered for course classes.
Click "Create event" to publish, or "Save as draft" to keep working on it. A draft can also invite existing Thril customers as participants, under Invite participants on the event's settings.
📑 Templates
The Templates tab on the Events page lists your venue's event templates and the ones other venues in the company share with you. Templates in a folder are grouped under it, and the search finds a template by name or sport.
- Click your own template to open and edit it. Another venue's shared template opens the create form instead, because only the venue that owns it can change it.
- Create event in a template's menu opens the create form filled in from the template.
- The menu also has Rename template, Move to folder, Share with all venues in the company and Delete template. Rename a folder with the pencil next to its name.
Editing a template
A template's page has the same sections as an event's settings, without the dates and times. The registration period and the reminder are set relative to the event's start. You can also change or remove the cover image. Click "Save changes" to save.
A saved template changes only the events you create from it afterwards. Events already created from it keep their own settings. When the template is shared, the other venues get your changes too.
🔄 Event Series
When you create a recurring event, Thril automatically groups all occurrences into an event series. You can view and manage all series from the Event series tab on the Events page.
What you see
The event series list shows:
- Name and event type (with cover image if set)
- No. of occurrences — remaining vs. total (hover for a tooltip breakdown)
- Series period — the date range from first to last occurrence
- Description, Instructor, Price per participant, and Visibility
By default, the list shows only active and ongoing series (series with at least one future occurrence). Use the filter button to adjust the cutoff date and view older series.
Viewing series details
Click any row to open the series detail panel. It has two tabs:
- Details — full series configuration: participant limits, pricing, event type, location, visibility, instructor, description, and cover image. Below it, Eligible session cards lists the cards that cover the series.
- Events — lists all individual occurrences that belong to this series.
Editing a series
Click Edit series in the details panel to update the series configuration.
Under Additional options the form has two switches for the whole series:
- Update registration periods sets when registration opens and closes.
- Update reminder notification sets when the reminder is sent, or removes it.
Both are off and leave the existing times untouched. Switch one on and the lead times are required. They are applied to every upcoming event in the series and override what is set on individual events. The times are calculated from each event's own start time, so a series that meets at different times of day keeps its per-occurrence timing. Only the presets are offered here, because a single fixed date and time cannot describe a whole series. The inputs start from the series' current lead times.
Important: Changes to a series are applied to all upcoming occurrences. Any individual modifications previously made to those events will be overridden. Past events are not affected.
🎓 Copying a course and running it at another venue
Duplicate a course
Open the course and choose Actions → Duplicate course…. The copy gets all the course's groups, but not its participants, payments or chats.
- Pick a New start date. The dates move in whole weeks, so the classes stay on the same weekdays.
- Leave Copy classes on to copy every class with its own time, court, price and instructor. Holiday breaks move with them.
- The copy stays unpublished. Check it and publish it when it looks right.
One registration deadline per course
You set Registration ends at on the course, and it applies to all its groups. A group has no deadline of its own. If groups need to close at different times, make them separate courses: build one, duplicate it, and change the copy's Registration ends at.
A course held at another venue
A course can be organised by one venue and held at another.
- The venue where the course is held grants the organiser a Link events authorization. See Authorizations in Thril.
- The organiser picks that venue under Link to external venue in the course form. Only venues that have granted the authorization are offered.
The course then shows up on both venues' course listings, and its classes are linked to the venue where it is held.
👤 Instructors
Instructors are managed from Settings → Employees and services → Employees. Once created, an instructor can be assigned to any event in the event form, to an event series in the series form, and to a course group in the course group form. Each of them takes several instructors.
Where the assignment is shown:
- Detail views list every instructor. The heading reads Instructor or Instructors depending on the count.
- Lists, tables, cards and the class calendar show one name and a +N counter for the rest. Hover to see the full set.
- The instructor filters on the events list, the venue class list and the course page match an event if any of its instructors is the selected one.
Every instructor assigned to an event counts as busy for that time slot in employee availability checks, sees the event in their calendar feed, and is notified if the event is cancelled.
Creating an instructor
Go to Settings → Employees and services → Employees and click "Create employee" to add a new instructor. You can provide:
- Name — the instructor's display name shown on the event page
- Photo — a profile image displayed alongside the instructor's name
- Bio — a short description of the instructor's background or expertise
Instructors are created manually and are not linked to any Thril user account.
🎟 Membership event allowances
A membership can cap how many events its members register for. The caps are configured per membership under Membership benefits and booking rules. What a member sees on your events:
- A cap that blocks replaces the register button with Your membership's event limit is full, naming the membership and the period. Joining the waiting list is refused the same way, so nobody queues for a place they could not take.
- A cap that charges the standard price shows This event is at the normal price on the event page, naming the membership and the date the member price returns. The member can still register.
- The price in the events list, on the event page and at checkout is the one the member actually pays, so a spent allowance is visible before registering.
Course classes never use an event allowance, because they are paid for through their course.
⚙️ Event Settings
Venue-level event settings can be found under Settings > Events. These settings apply to all events at your venue. The page has three tabs: General settings, Categories and Attendance tracking. The attendance settings are described in Event attendance.
Separate classes from events
When enabled, classes are displayed in a separate "Classes" tab in the mobile and web apps, while regular events stay in the "Events" tab. Useful if your venue runs recurring group fitness classes or other structured programmes alongside one-off events.
Allow event payments before confirmation
When enabled, customers can pay for their event participation before the event is confirmed. Customers are not forced to pay immediately. This simply allows them to pay right after registering if they choose to.
When this setting is active and a session card covers the event, customers who have an applicable session card will see a "Participate & use session card" button. Clicking it opens a confirmation step where they can select which session card to use (if they hold more than one applicable card) and confirm their participation — joining and paying in a single action.
Require payment to confirm participation
When enabled, participants are only confirmed after a successful payment. Instead of joining an event for free and paying later, customers must complete payment upfront to secure their spot.
Key behaviours:
- If a customer pays but no spots are available at the time the payment is processed, a full refund is issued automatically and the customer is notified.
- Whether joining the queue needs a payment is a separate setting, Require payment to join the queue. This setting does not affect the automatic promotion of users from the queue when a spot is freed.
- This setting only applies to paid events.
Require payment to join the queue
The default for events that leave Payment to join the queue at Venue default. When enabled, customers pay the event price or use a session card to join the queue.
Key behaviours:
- When a spot opens, the first customer in the queue moves in automatically and is already paid.
- If a customer leaves the queue, or no spot opens before the event starts, they get the whole payment back with no refund fee. When the money goes back to the original payment method, Thril keeps its commission, so you cover the full refund from your payout. See What a payout deducts.
- A payment made through Thril, such as a card or MobilePay payment, or a Stebby payment: when leaving, the customer chooses between credits and the original payment method. When the event starts, it goes back to the original payment method.
- A session card: the session goes back to the card.
- Epassi: the amount comes back as credits.
- Changing this setting affects every event left at the venue default, also existing ones. Customers already in a queue keep what they paid, and free queue places stay free.
- Staff can still add a customer to the queue by hand without a payment.
- This setting only applies to paid events, and not to course classes or tournaments.
Disable participant cancellation
When enabled, confirmed participants cannot leave events or place their spot for sale. Joining any event, tournament, or class effectively becomes immediately binding.
Disable participation selling
Only shown when Disable participant cancellation is off. When enabled, confirmed participants cannot place their spot for sale after registration ends, but they can still leave the event. Existing spots already listed for sale at the time you enable this setting are not affected.
✉️ Automatic participant emails
When a participant's spot is confirmed, Thril automatically sends them a confirmation email. The email includes:
- Event name
- Date and time
- Venue name and address
- A "View event" button linking directly to the event page
If the participant still has an outstanding payment, the email also includes a reminder to open Thril and pay before the event starts.
Participants who have disabled email notifications in their account settings will not receive this email.
✅ Best Practices
- Always include a clear event name and description.
- Use registration end times to control last-minute signups.
- Make sure reminders are timed early enough to improve attendance.
- Use visibility settings to control who can find or join the event.
- For competitive events, set participant limits and enable queueing.
- Use "Require payment to confirm participation" for high-demand events where you want to minimise no-shows and ensure only committed, paying participants hold spots.
Event attendance
Attendance tracking lets staff mark event participants as present or absent, lets customers check themselves in, and can require the customer to be at the event location.
Games
The Games page provides a real-time activity feed of your venue, showing active resources, current players, and live reservation status.