Authorizations in Thril
Authorizations enable secure collaboration between venues, allowing you to grant and manage permissions for cross-venue operations.
What are authorizations?
Authorizations let you connect with other venues in the Thril ecosystem and share access safely. Common use cases for venues and sports clubs include:
- Letting a partner venue view your memberships for a joint loyalty or benefits program
- Allowing an event organizer to link events to your venue calendar without accessing your account
- Allowing another venue or club to make reservations directly on your calendar resources
- Coordinating cross-venue programs and campaigns between clubs
Once created, an authorization stays active until you deactivate it. You can revoke or restore access at any time.
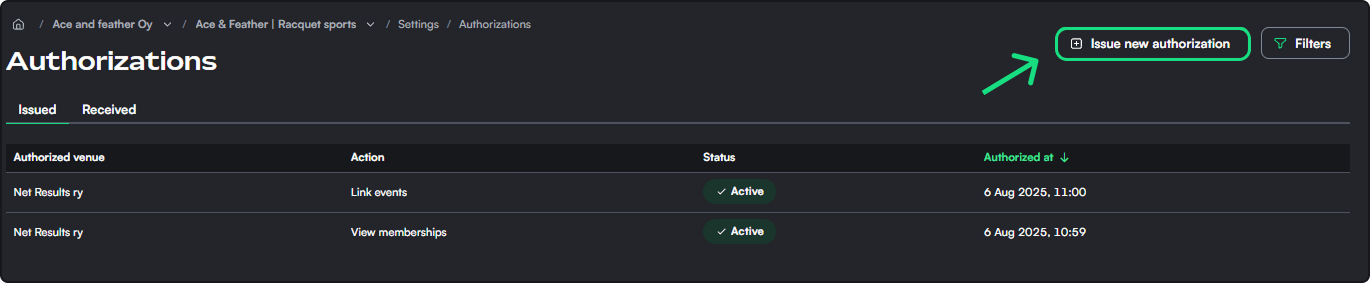
🛠️ How to Create a New Authorization
- Navigate to Settings > Authorizations from the left-hand menu.
- Click the green "Issue new authorization" button in the top-right corner.
- In the modal:
- Authorized venue: Start typing a venue name. This field autofills from existing venues or clubs on the Thril platform.
- Note: Authorizations can only be issued to venues that exist on the Thril platform.
- Action: Choose what the other venue can do on your behalf:
- View memberships: Grants them access to your membership list
- Link events: Allows them to link events to your venue calendar
- Allow calendar reservations: Lets another venue or club make reservations directly on your calendar resources
- Authorization status: Set as Active (you can switch to Inactive later if needed).
- Authorized venue: Start typing a venue name. This field autofills from existing venues or clubs on the Thril platform.
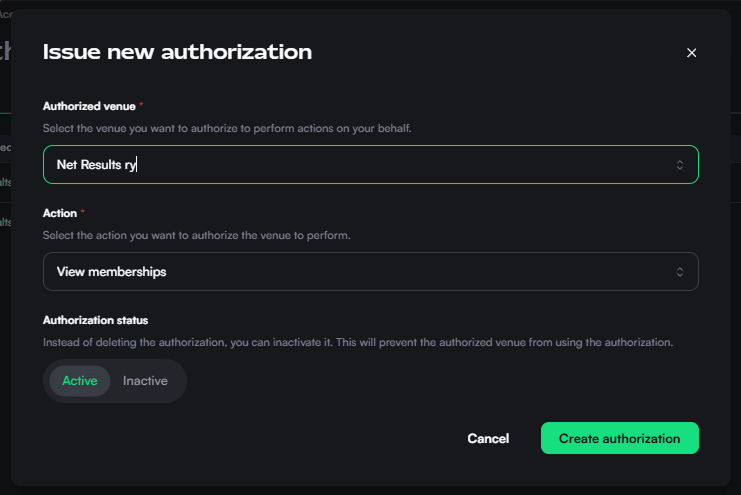
- Click Create authorization.
The authorized venue will now see the granted permissions under their own Authorizations > Received tab.
📋 Authorization types
View memberships
This authorization lets another venue or club check whether a customer holds an active membership at your venue. The authorized party's staff cannot see your full member list or any personal details, but they can verify a single customer's membership status and grant them benefits such as a discounted price.
A typical use case is a cross-venue benefits program where a partner venue's customers receive a discount at your facility based on their membership. The partner grants the benefit from their own system without seeing any of your other data.
Example: You grant members of a local sports club a discount on your padel courts. The club manages their own member registry in Thril, so the discount applies automatically to the right people.
Link events
This authorization allows an external organizer or partner venue to attach events to your venue calendar. The authorized party can create an event and associate it with your calendar view so it becomes visible to your customers. They do not gain access to your venue settings, resources, or any other bookings.
In practice this suits situations where an external event organizer runs sessions at your venue and wants their event sign-ups to appear directly in Thril under your calendar.
Example: A local sports club organises an event at your venue, and the event appears in both calendars with the venue clearly marked.
Allow calendar reservations
This authorization gives another venue or club the right to make reservations directly on your calendar resources. The authorized party can book time slots on behalf of their own customers or members without you having to handle each reservation individually.
This works well when a sports club regularly rents your courts or halls and wants to manage their bookings independently from their own Thril account. The permission is limited to making reservations and does not grant access to any other settings or data at your venue. Negotiate contract prices with the club in advance to keep billing clear for both parties.
Example: A badminton club books their weekly practice slots directly from their own Thril account. Because reservations are logged automatically, billing stays clear and neither party needs to track bookings manually.
🗂️ Managing Issued & Received Authorizations
Your authorizations are split into two tabs:
- Issued: Shows authorizations you have given to other venues.
- Received: Shows authorizations other venues have granted to you.
Each authorization displays:
- Authorizing venue
- Action permitted
- Status (Active or Inactive)
- Timestamp for when it was granted
Click on any row to view more details or deactivate the authorization.
🔄 Revoking or Deactivating Access
You can deactivate an authorization at any time without deleting it:
- Go to Authorizations > Issued
- Click the relevant authorization
- Toggle the status from Active to Inactive
This immediately disables the other venue's access until you reactivate it.
Announcements
Publish in-app announcements to your venue's customers, target them by list or individual, and reach them instantly with a mobile push notification.
Branding
Use Thril's branding tools to shape your venue's public image, build trust, and boost bookings with a polished, professional profile.